Motor Control Using L298N H-Bridge
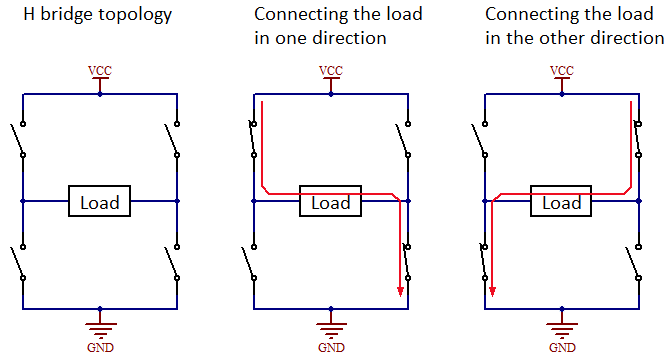
DC motors cannot be connected directly to the Arduino for several reasons:
These shortcomings are resolved by using the Arduino to control an H-bridge motor controller such as the L298N.
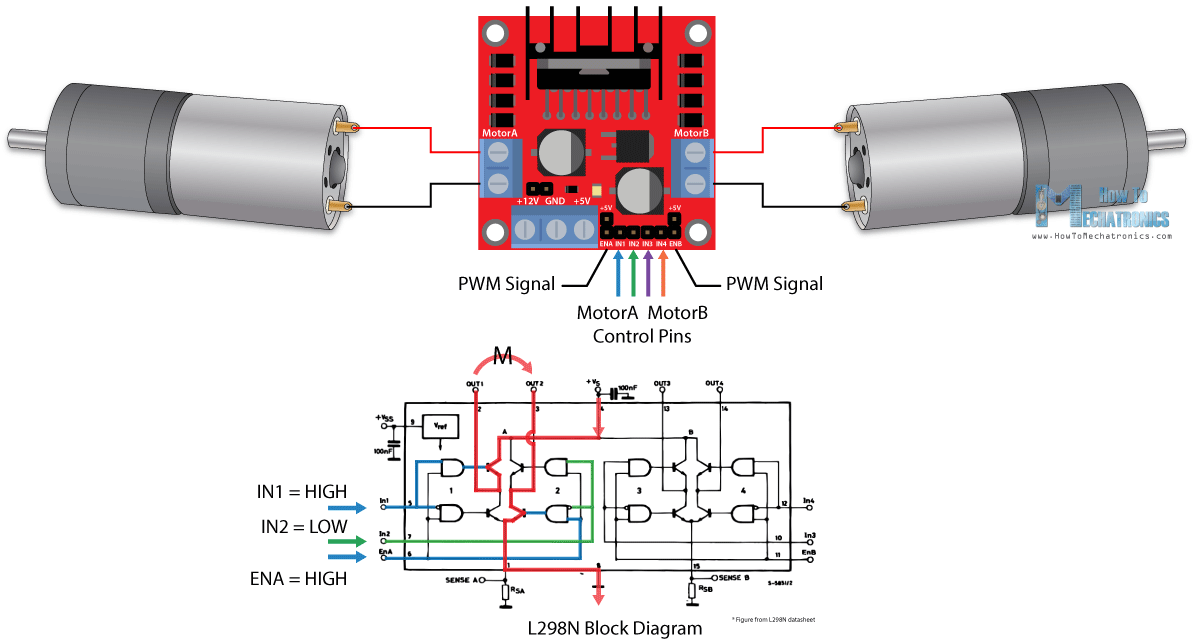
The motors are connected to the motor output pins on the L298N
Motor Speed
L298N Pins called Enable 1 and Enable 2 are used to control the motor speed. They can either be connected to 5V for the motors to always run at maximum speed, or can be connected to PWM output pins on the Arduino (pins 3,5,6,9,10, and 11) which are marked with a tilde (~).
Speed is controlled by doing an analogWrite (pin, amount) of between 0-255 to the selected enable pin.
Motor Direction
Motor direction is controlled by digital logic signals supplied by the Arduino to L298N (IN1 and IN2) and to Pins (IN3 and IN4). If the logic level of IN1=IN2 or IN3=IN4, the motors stop.
- The Arduino pins cannot supply enough current to drive motors
- The Arduino pins cannot supply enough voltage to drive most motors
- The Arduino cannot drive motors in both directions
These shortcomings are resolved by using the Arduino to control an H-bridge motor controller such as the L298N.
The motors are connected to the motor output pins on the L298N
Motor Speed
L298N Pins called Enable 1 and Enable 2 are used to control the motor speed. They can either be connected to 5V for the motors to always run at maximum speed, or can be connected to PWM output pins on the Arduino (pins 3,5,6,9,10, and 11) which are marked with a tilde (~).
Speed is controlled by doing an analogWrite (pin, amount) of between 0-255 to the selected enable pin.
Motor Direction
Motor direction is controlled by digital logic signals supplied by the Arduino to L298N (IN1 and IN2) and to Pins (IN3 and IN4). If the logic level of IN1=IN2 or IN3=IN4, the motors stop.
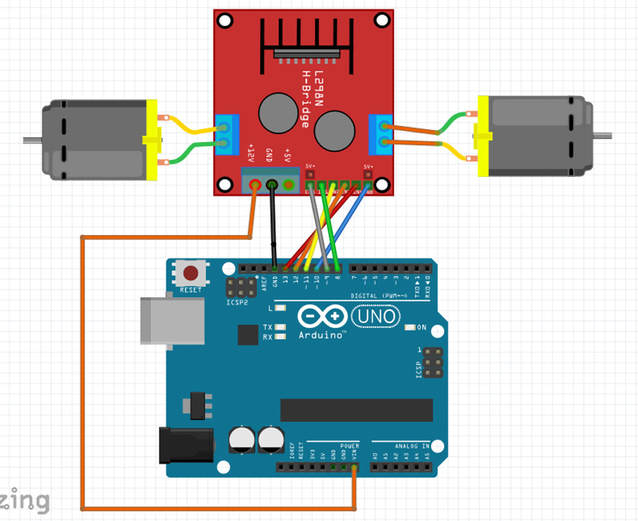
Wiring from L298N to Arduino
Motor A Enable<--- Arduino Pin 9
IN1<---Arduino Pin 8
IN2<---Arduino Pin 11
IN3<---Arduino Pin 12
IN4<---Arduino Pin 13
Motor B Enable<--- Arduino Pin 10
Motor A Enable<--- Arduino Pin 9
IN1<---Arduino Pin 8
IN2<---Arduino Pin 11
IN3<---Arduino Pin 12
IN4<---Arduino Pin 13
Motor B Enable<--- Arduino Pin 10
|
|
References for the L298N Motor Controller with H-Bridge
Introduction to L298N: https://www.theengineeringprojects.com/2017/07/introduction-to-l298.html
Arduino DC Motor Control Tutorial: https://howtomechatronics.com/tutorials/arduino/arduino-dc-motor-control-tutorial-l298n-pwm-h-bridge/
Introduction to L298N: https://www.theengineeringprojects.com/2017/07/introduction-to-l298.html
Arduino DC Motor Control Tutorial: https://howtomechatronics.com/tutorials/arduino/arduino-dc-motor-control-tutorial-l298n-pwm-h-bridge/